Learning a pressure cooker, or in my case, an electric pressure cooker (brand Instant Pot) means trying out new recipes and seeing what it can do.

In the case of chicken noodle soup, the answer is a whole hell of a lot.

When I made it, I went online to see what the general suggestions, and recipe directions/ingredients are for chicken noodle soup.

The best suggestion, which I heeded, was to cook the noodles separately because of the difference in required cooking time.

Other included cubing the chicken before cooking it (for people using boneless chicken breasts or thighs) and suggestions on how much broth and water to include in the pot.

Finally, I was reminded that cooking bone-in chicken means leftovers will be a little gelatinous, from the natural binders in the chicken cartilage.

(See just the recipe here.)

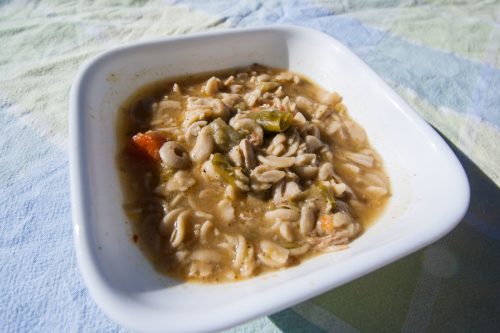
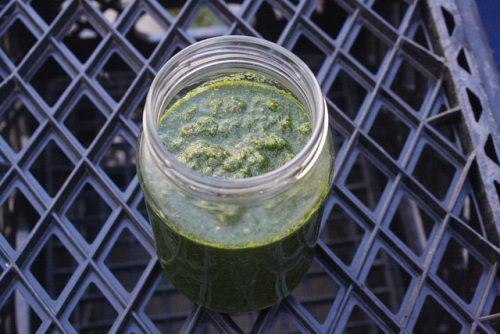
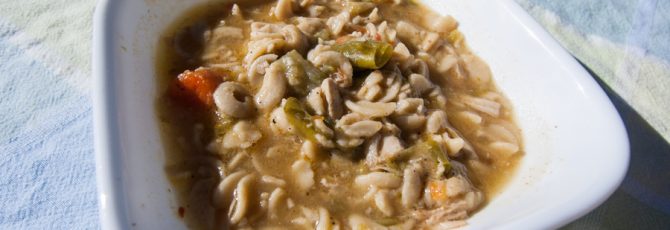
Chicken noodle soup made (mostly) in an electric pressure cooker (Instant Pot). Bone-in skin-on chicken legs were used, as well as green chiles (Anaheim peppers).

I didn’t see any particular instructions on what to do with chicken legs.

Chicken legs are probably the cheapest meat I can get and when I went to the store to get ingredients, they were only $1 a pound, by far the best deal in the store.

They also go on sale for $4 for a 10 lb frozen bag.

If you’re looking for a cheap chicken soup, this is it.

I put the metal steam rack in the bottom, put in two chicken legs, the cut veggies (squash, zucchini, carrots and green chiles), poured in six cups (32 ounces) of chicken broth, a little water, half a bullion cube, locked the lid and turned it to 15 minutes .

After it finished cooking, and I allowed it to “natural release” for 15 minutes, I vented the unit and extracted the first chicken leg with a gloved hand and started taking the meat off the bone and putting into a bowl. Once both chicken legs has been stripped of their meat, I threw them back in the pot and started stirring. Meanwhile, I already drained the pasta and, after realizing everything would be easier in a larger pot, I transferred everything to the pot the pasta had been in.

I added the noodles and realized it lacked salt, so, remembering a Cook’s Illustrated I read on the topic, I grabbed my trusty light soy sauce, my trustier fish sauce and seasoned the soup.

Voila!

Unfortunately, for leftovers, the pasta continued to soak up the broth. I was fine with it, but one could have added a little more.

What did I learn?

Chicken legs or (bone-in) thighs work just fine, so long as you’re willing to fish them out, strip the meat off the bones and put it back in the pot.


Pressure cooker chicken noodle soup

Makes 10 servings

Ingredients

2-3 chicken legs (bone in, skin

6 cups chicken stock (48 ounces)

2 cups water

1 bullion cube (optional)

1 lb carrots

1 medium onion (optional)

1 zucchini, Mexican squash, yellow squash or other squash

2-5 green chiles (Anaheim peppers) or other peppers of choice, such as bell peppers or Poblanos.

1/2 to 1 lb pound mushrooms (optional)

Other vegetables as desired, including celery and garlic

Soy sauce to taste

Fish sauce to taste

Pepper to taste

1 lb noodles

Directions

1. Cut all the vegetables into bite-sized pieces.

2. Place the steamer rack at the bottom of the (electric) pressure cooker, then place the chicken legs on top.

3. Put the vegetables in the pot, followed by the chicken stock, the bullion cube (if using) and the water.

4. (Electric) Set the pressure cooker for 15 minutes. Allow for 15 minutes of natural release, and then vent, if desired. If using a stove top pressure cooker, bring to pressure and cook for 15 minutes.

5. While the soup is cooking, in a medium pot, heat water to boiling. Salt the water, then add the noodles and cook as per directions.

6. Once the soup is vented, or the top can be opened, remove one chicken leg at a time and, being careful not to burn your fingers, with a fork, knife or both, remove the meat from the chicken bones. Cut the meat into the desired-sized pieces. Continue with the rest of the chicken legs. Add the meat back to the soup.

7. Drain the pasta and combine with the chicken soup. If desired, transfer the soup from the pressure cooker to the pasta-cooking pot.

8. Season with soy sauce and fish sauce, until soup reaches desired saltiness.

In New Mexico, Chile is king. No questions. No debate. Red, or green? Christmas? (Christmas is both red and green.)

(If you want just the recipe, see it here.)

Zhug, after the cilantro and jalapenos and citrus and salt have been blended together. Ready for some fiery consumption.

Cilantro certainly plays a second fiddle, in salsa, as do tomatoes, but still: chile, cilantro, these are the building blocks of many New Mexican meals. So, what does that have to do with zhug? Well, combine those two things into one dish. Blew your mind, didn’t it?

Chile and cilantro are not the sole property of New Mexican cuisine and lots of other cultures do complimentary things with them that I think we should all copy, or at least, pay attention to.

That New Mexico can learn a lot from other parts of the world, including from the middle-east, where zhug originated.

What is zhug, anyway?

It can either be described as a cilantro-based hot sauce (and, depending on how you make it, I mean Hot) or as chile and cilantro pesto. Take your pick. I prefer the former, partially because I make mine scalding.

It’s a very simple sauce. Put cilantro, lemon juice, lime juice and, important here, peppers, into a blender. Blend. Blend, blend, blend.

That’s it. Maybe add some salt, to taste. And you’re done. It’s a pesto-like hot sauce or a hot pesto. Either way, zhug goes well with pita bread and tabbouleh, with some hummus. Maybe you’re going to make zucchini fritters. Add some on the side, along with tzatziki.

I should add, this sauce is very dear to my heart. Being such a fan of cilantro, even naming my blog after a proclivity for it, I gotta say. We all should love zhug.

Zhug

This Yemeni/Somali hot sauce goes great on most things, including rice, fritters and in conjunction with hummus.
Prep Time15 minutes
Cook Time5 minutes
Total Time20 minutes
Course: Side Dish
Cuisine: Somali, Yemeni
Keyword: hot sauce, sauce
Servings: 4 people
Author: Wheeler Cowperthwaite
Cost: $5

Equipment

  • Blender or food processor

Ingredients

  • 10-20 hot peppers (jalapeno) rinsed and chopped (de-seed if heat is an issue)
  • 1-3 bunches of cilantro washed and chopped
  • 3-6 garlic cloves chopped
  • ¼ teaspoon ground cardamom or seeds from 6 cardamom pods crushed
  • ¼ teaspoon ground coriander (cilantro seeds)
  • ½ teaspoon ground cumin
  • 1 tbsp lime juice more to taste
  • ¼ to ½ cup lemon juice more or less to taste
  • 1 tablespoon olive oil
  • Salt to taste
  • 1/4 cup Chopped mint optional

Instructions

  • Chop the cilantro, peppers and garlic.
  • Put all the ingredients, sans salt, in a food processor or blender. Blend until it reaches desired consistency.
  • Add a small amount of salt, to taste.


If you want the full gallery of full-quality photos, they are licensed under a Creative Commons 2.0 Attribution-only license. See them here.


Jalapenos in a blender, before being blended, to make Zhug. Add liquid (lemon/lime juice) to aid in the blending process.

Cilantro, being being chopped up and put in a blender to make Zhug.

I’ve been a fan of curry pastes for a long time, as well as a fan of buying ingredients in bulk for cost savings.

I don’t just buy curry pastes in bulk. Potatoes, too, as well as chicken thighs when there’s a big sale.

Somehow, and I don’t know how, I alighted on the idea to combine all three of these things. It may have started with pan-fried potatoes, or maybe with oven baked chicken thighs (skin on, bone in). It may have its genesis in yellow curry fried rice, where I first learned that the (Thai) curry paste works incredibly well as a seasoning.

Before I go any further, I need to mention that this dish goes really well with at least tzatziki, and probably zhug as well.

Yellow curry paste!

Irregardless of how it happened, I then used yellow curry paste (the mildest of the pastes) as a seasoning for pan fried potatoes. All of this is being done in a cast-iron skillet, of course.

Finally, I decided that the best of all worlds is to put the chicken thighs on top of the potatoes, and maybe a few other vegetables and then bake to allow the juices and fat to seep into the potatoes, mingling the flavors.

The problem with chicken thighs is they take a long time to cook at a high temperature. It’s not so much a problem as something you need to be aware of going into the cooking process.

(Continued after the jump)

(more…)

So, what’s for dinner?

That’s always a problem, right? Pasta, or . . . What else is in the kitchen? Refrigerator? And the time factor? Do I need to go to the store?

In my house, there are a few things always on hand: vegetables, maybe some meat (leftover, marinated or unprepared), always uncooked rice (and often times, leftover sushi/vinegared rice, plain recipe).

For me, the easiest meal is often times the humble rice bowl. I cook up some rice in my rice cooker, I turn it into sushi/vinegared rice (blog post). Then, do I want to make sushi? Or a rice bowl? Or maybe onigiri? Or maybe, a few sushi rolls now and rice bowls for lunch tomorrow, and some onigiri (rice balls) for later? The options are endless.

Peppers, grilled chicken, cucumbers and seaweed, at the very bottom, sit on top of rice in this rice bowl.

So, what is the rice bowl?

Well, it’s simple. You make some vinegared/sushi rice, put it in a bowl, cut up some veggies into bite-sized pieces, maybe cook up some meat and cut it up too, then throw it all on the rice.

Which veggies? Well, cucumbers are always nice, as are avocadoes. If you thinly slice, then deseed lemons, they are delicious. Being in New Mexico, I always add green chile peppers (unroasted) as well as jalepenos. Nori (seaweed) adds much needed taste. Green onions are also a good addition.

What else do you have? Throw it in there! Leftover steak? Cut it up, throw it in. Same goes for chicken, pork, or other meats.

Add some soy sauce, maybe some spicy/Sriracha mayonnaise, maybe some eel sauce, (Link to Amazon; once I make my own, I will post the recipe and update the link. Your local Asian store should have it for cheap.)

Bam! You’ve got a simple, relatively healthy dinner. Veggies, a little meat. Sure, the rice isn’t particularly healthy, but it’s frugal. Very, very frugal.

Avocados! Taste delicious in rice bowls, as do lemons. Seaweed is also a must.

(I buy sushi rice, Kokuho Rose variety, in 40 pound bags to be as frugal as possible. I store them in five-gallon buckets with lids, a carry over from my days as a homebrewer.)

There you go. Rice bowls. Simple. Delicious. Easy.

Seaweed (nori) is the first thing to go on top of the rice.

See all the photos on Flickr, in high quality.

Realized you don’t know how to make sushi rice? Here’s the recipe.

Want just the rice bowls recipe? Right here.

Simple rice bowls

Makes: as many as you have rice for

Ingredients

Sushi/vinegared rice
1/2 to 1/4 cucumber
1-3 green peppers
1 jalapeno (if you like it spicy)
1 piece of cooked meat (heated up if desired)
1/2 sheet of nori (seaweed sheets)
1 avocado
1 lemon, thinly sliced
All other vegetables, cooked or raw, as you see fit
Other ingredients as you see fit, or have seen in a sushi roll
Condiments such as eel sauce, Sriracha mayonnaise and eel sauce or cream cheese

Directions

1. Cut up the vegetables into bite-sized pieces. Cut the lemon slices into quarters.
2. Put enough rice into the bottom of a bowl.
3. Tear up the nori and place on top of the rice.
4. Put the cut up vegetables and meat, if using, on top of the nori, which is on top of the rice.
5. Heat up in the microwave for 30 second to 1 minute if working with leftovers or desire it hotter
6. Add condiments over the top and enjoy.

Tzatziki, a yogurt sauce made with lemon juice, dill, and a few other ingredients, is a fantastic side to a variety of dishes, including zucchini fritters, curry fried rice and hummus, especially when paired with pita bread.

(Skip to just the recipe)

It also goes very well as a compliment to zhug (a hot sauce made of cilantro, peppers and lemon/lime juice) creating what for me is the ultimate quadfecta in pita and falafel sides: zhug, Tzatzikihummus and tabbouleh.

Tzatziki poured over curry fried rice makes an easy and delicious meal. All this is missing is some zhug.

There are a couple of things to consider when making tzatziki, aside from how to spell it.

The first is what kind of yogurt to use. I use full-fat plain yogurt or, if I’m going through a DIY phase, I use yogurt I’ve made from whole milk.

Plain full-fat yogurt is superior (in my opinion) to the more popular and prevalent fat-free and 99 percent fat free options because it has less sugar.

Yogurt makers add sugar to make up for the taste of the lost fat. Naturally occurring fat is a lot more healthy than artificially added sugar. Less sugar, less problems.

Dill piles up in a container of yogurt being used to mix the tzatziki.

Second,  good dill, which can be surprisingly hard to find. When I find it, I buy a large bunch. You can also add some chopped mint to the batch, if you’re feeling a little adventerous or have mint on hand. If I have it, I add it. If I don’t have any available, then it doesn’t go in.

Tzatziki is more like art than science. The amount of lemon juice used, of dill, of lime juice, of salt, of garlic, everything is up for interpretation.

For just the recipe, see the page here.

Wheeler's Dill-icious tzatziki

This yogurt staple is heavy on the dill, lemon, and lime and offsets the saltiness in many foods.
Prep Time30 minutes
Total Time30 minutes
Course: Side Dish
Cuisine: Mediterranean
Servings: 2 cups
Author: Wheeler Cowperthwaite

Ingredients

  • 2 cups plain yogurt
  • 2+ tbsp finely chopped fresh dill more as desired/to taste
  • 2+ tbsp lemon juice more to taste
  • 1-2 tbsp lime juice
  • 2 cloves garlic, finely minced
  • 1 pinch black pepper
  • salt to taste
  • 1 tbsp fresh mint, finely chopped (optional)

Instructions

  • If thicker tzatziki is desired, either buy “Greek” yogurt or strain regular yogurt by placing a cheesecloth in a strainer, and the strainer in a bowl, and pouring the unstrained yogurt into the cheesecloth lining. Cover and let sit in the refrigerator overnight or for 8 hours.
  • Chop garlic, dill and, it if is being used, mint.
  • Mix yogurt in a medium bowl with all of the ingredients except for salt, until will combined.
  • Salt to taste immediately and use or refrigerate for 8+ hours and then salt to taste.

It was Friday, which meant the Hispanic grocery on Wells, Marketon, was having its one day sale. I looked at the ad and lo and behold, Swai was on sale. However, I had no idea what Swai is so I looked the confusion fish up.

The Iridescent shark (it’s not a shark) is actually a type of catfish (shark catfish, Wikipedia says.) It is, however, packaged as “swai.” Three names: iridescent shark, swai, and catfish. It’s a native to fresh water in southeast Asia.

Speaking of, which, one of its relatives, the Wels Catfish, is reported to jump out and eat pigeons. If only we had them in our fountains.

At $1.99/lb, I figured they must taste decent enough and if they’re anything like their North American cousins, the flesh should stand the test of the grill. So, I bought two packages, totaling 7.89 pounds. The fillets I bought were huge, the length of a small cookie sheet. I poured lemon juice on it, threw on some lemon pepper, pepper and garlic salt and let it sit for half an hour before throwing it on the grill.

The plain recipe is: here.

(more…)

I love fish, which seems to be a shame considering I was born and raised in the inland desert. While smoked salmon was a treat growing up, it has always been an unaffordable luxury in my adult life. Fortunately, there are many alternatives, including one of my favorite fish: the sardine.

Two of the three sardines in a can sit on English muffin halves, straight from the can.

Two of the three sardines in a can sit on English muffin halves, straight from the can.

Lightly smoked canned sardines may not have the exact taste, or consistency, that smoked salmon does. They certainly do not have the nice presentation it does. However, they are cheap (around a dollar a can for three sardines) and make for sustainable and delicious cheap eats.

 In this case, I have been using English muffins as the base, although bagels or bread would certainly work as well. That and some cream cheese. Two adjuncts, capers and red chopped red onions, as seen in cream cheese and lox preparations, make good companions. Sometimes I like them, sometimes I like it plain.

That’s all there is to it. Kippered herring is also a good choice, as are other smoked canned fish.

Three sardines come in a can but usually one sardine is sufficient to cover an English muffin so I save the third for the next day.

The sardines' supple flesh has been spread over the muffins.

The sardines’ supple flesh have been spread over the muffins.