The following is the story of the decline and death (euthanasia) of my cat Tweaks, on April 30, 2018. During my grieving process, I found other people’s stories of their own pet’s deaths, declines, and poetry about animal deaths helped me to grieve the loss of my own beloved cat.

It is in that spirit that I have posted my own story. When another of my cats, Apricot, died in 2014, I recounted her death as well. I had previously hidden that post (after feeling ashamed, although I’m not sure why) but, after grieving, and realizing that sharing these stories can help others, I made it public again.


On April 30, 2018, (a Monday), I attempted to load my incredibly weak and sick cat, Tweaks, into his carrier.

Even though he could barely move, he still had enough left in him to parachute his legs to make it as hard as possible for me to get him into the carrier.

On April 28, a Saturday, I took Tweaks to the vet because he had stopped eating the night before. I couldn’t even interest him in tuna.

After some blood work, an x-ray and a physical exam, they decided that he likely had a “mass” on his liver. That’s why he wasn’t eating. (Over the past few years, he had been gradually losing weight and becoming a pickier and pickier eater).

Tweaks on Sunday (pictured here) was very weak and restless.

The prognosis was “poor,” but the vet still gave me some liver medications, a syringe and showed me how to force feed him and how to force him to take pills.

I was hopeful that I could get him to start eating again, that there was no mass.

On Saturday night, I managed to get 20 CCs of water mixed with wet cat food into him, and onto him, and onto my clothes and the floor. It was hard, but I did it. I also managed to give him his pill. That would be the last time.

Sunday (April 29), I tried multiple times to both “pill” him and to force feed him with the syringe. All the attempts went badly but more importantly, I could see he was quickly deteriorating. By the end of Sunday, he could barely jump, he could barely walk and he was incredibly restless. Never have I seen a cat get up and move so much.

He sat on my lap on the couch a few times, for a few minutes, and briefly joined me on his favorite spot: half on the arm of a recliner, half on my leg.

Each time, he couldn’t sit still for more than a few minutes.

I kept a vigil with him. He moved between the inside of the closet to by bed, to the floor, to the doorway, and then back to the inside of the closet.

A few times, he jumped on the bed, moving from his heating pad, to the middle of the bed, to the bottom, and then a few times, coming up to my chest level, briefly lying down before moving again, the same spot, next to me, he used to sleep in when he was well.

At bed time, he finally decided to move to the older chair in the office and he spent the night there.
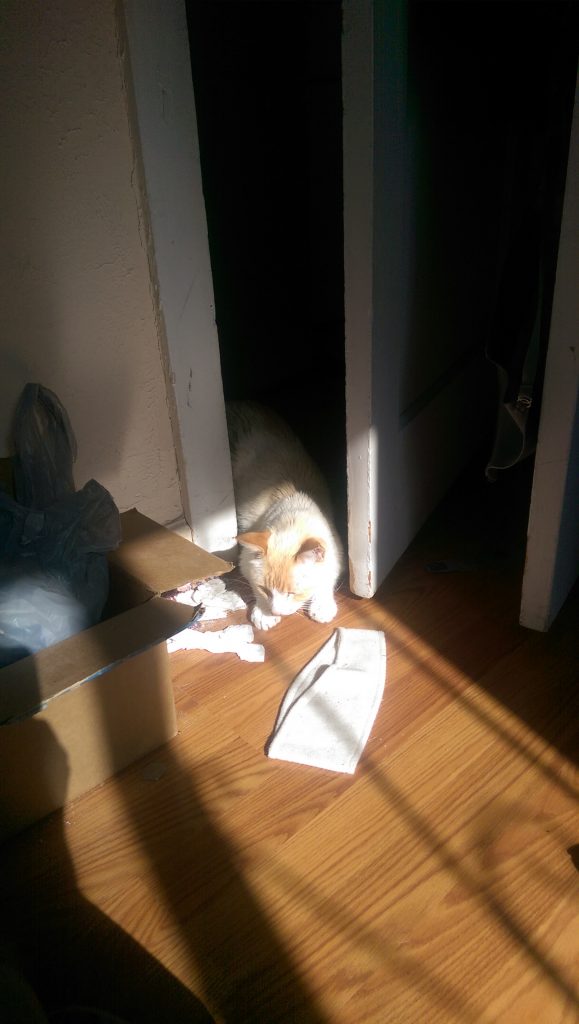
As he declined, Tweaks kept on moving on the floor, on the bed, from sun to shade.

When I woke in the morning (April 30), I could hear a sound here or there in the house, but I wasn’t sure it was him. I woke early, maybe 6 a.m., but I was afraid to check on him. I was afraid he had passed in the night. I was hopeful he had passed during the night so that his suffering would be over. I was scared he had passed in the night because that meant I would not be able to spend his last moments with him.

He was awake, swishing his tail. I picked him up and put him on the bed. He continued to be restless. I gave him one last cuddle on the bed.

In the living room, I laid out a partially folded flannel sheet for him.

After I left the house, I texted my girlfriend, Michelle. (She was at the house when I came back with Tweaks on Saturday, after taking him to the vet. I asked her to go home. I prefer to be alone when I grieve.) I told her, if she wanted to see him one last time, she should head to the house then because the appointment was for 11:15.

When I came home, after finishing a story at work, (Monday was the B-section deadline day) (I left at 10:50. I had previously called the vet and made a 11:15 appointment) he was on the flannel sheets.

As I tried to get him into the carrier, this incredibly weak being managed to parachute out his front and hind legs, managed to make it incredibly hard to get him in. I did. I still buckled his carrier into the front seat. I drove to the vet, the AC on medium, the music barely audible, taking each turn, dip and bump and gingerly as I could.

In the waiting room were two other people waiting to be seen. We waited. And waited. I opened the top of his carrier (it was soft shelled) and was able to rub his head and cheeks. Up until I put him in the carrier one last time, he would still head butt my hand.

The woman next to me had a silent chiuaha and the man had a 15-year-old small dog. They thought the older dog might have had a seizure.

Of course, they asked if my kitty was sick.

This set me off and, through sobs, I said I was here to euthanize him.

They asked what happened, and I explained, as best I could.

The man recounted the few cats he’s had, as well as his daughter’s cat. One cat he took with him everywhere and he was driving to Boise, Idaho, when he let her out of the car at a park so she could pee. (He was driving a convertible). Nearly 200 miles later, he realized he didn’t know where the cat was and he drove back to the park, but couldn’t find her. He put an ad in the local paper, offering a $200 reward. As he was driving around, looking for her, he saw an animal on the side of the road that had been run over.

He didn’t stop, because he couldn’t stop. He couldn’t bear to know she had been killed. He never saw her again.

The man said he cannot bear to get another animal after his 15-year-old (spunky!) dog dies. It’s too much heartbreak.

My dad said the same thing when my first cat, Angel, passed away (from complications of old age). He told me he did not want to have another animal because of the inevitable, or possible, pain losing such a beloved one causes.

I got her when I was in the first or second grade and she lived to 19 or 20, despite problems with cat anorexia and bulimia. (In later life, she had her teeth removed because of the bulimia).

I left her in Carson City with my dad when I went away for college at 18, although she was still bonded to me. She truly became my dad’s cat after I moved to Germany for over a year to be an au pair.

This is tweaks in 2016. His decline was incredibly fast, as it is with many cats.

Finally they took me into a room and the vet gave Tweaks a sedative. With the carrier open, I was able to pet him as he fell asleep (although his eyes remained partially open).

Finally the vet came back, pulled him out of the carrier and into a towel, shaved his leg, dabbed it with alcohol, stuck an IV line in him, hooked up the barbiturate to his IV and plunged it in. (“It’s the same thing the kids are killing themselves with out there,” she said, which wasn’t totally true because barbiturates and opioids are different types/families of drugs and as the cops and courts reporter, who reads all the autopsy reports for Rio Arriba County, I can attest very few people overdose on barbiturates in our area).

“Take as much time as you need,” she said, before wrapping him in the towel.

Somehow, he was placed back in the carrier and, after a few minutes of uncontrollable sobbing, I went to pay. The vet waived the fee (likely because her fellow vet gave me a 30-day supply of liver pills when his life expectancy was closer to seven days, at a cost of $50) and I walked to my car, wailing.

Finally, able to drive home, I started digging his grave. The day before, I had gone to Lowe’s to buy a shovel so I would be prepared. Three-quarters of the way through digging the hole, the brand-new shovel broke, and I went back to the hardware store for a shovel that didn’t have a wood handle.

When I arrived home again, I finished digging the whole, went back inside, grabbed a polarfleece blanket and said my one last goodbye to my lifeless cat. His face was pointed away from me and I remember looking at his eyes one last time. The membrane had already begun to cloud over his beautiful eyes. I wrapped him in the towel, followed by the blanket.

I thought it was ironic that this one last time, I was able to make him into a kitty burrito, when he had so vehemently refused it before.

I carried him to the grave, placed him in, and then got a can of smoked sardines, a can of tuna, and one of the toy rats he so lovingly destroyed with his back paws before he started to lose his desire to play.

After cleaning myself up, I dressed and went back to work.

It wasn’t until the following Wednesday, May 2, that I was able to get closer to finishing his grave. I de-labeled 10 stubby beer bottles, cleaned them, and used them to mark the borders of his grave, to mark the 10 years of his life before I got him.

The plan is to plant some shade-friendly annual flowers on his grave, and mark the outer boundaries with a few more bottles to commemorate the years I got to spend with him and two blue flourishes for his eyes.

Now, each day when I open the front door, I expect him to come running. I walk to the bedroom to charge my phone and I expect him to be on the bed.


Early life

When I first got Tweaks, it was shortly after I lost Apricot. I went to the Santa Fe Animal Shelter which, if you’ve never been, is actually hard to get to, off of the frontage road of 599.

I was walking around the cat room and I saw him, and he was friendly enough. He was 10, a little old, but I figured that older cats need to be adopted too, need to be offered the good life later in life. Santa Fe is overrun with older cats whose owners abandoned them, moved away or, more frequently, died.

I learned from the staff that Tweaks was originally brought to the shelter, 10 years prior, as a stray. He was then neutered, chipped and adopted out.

For whatever reason, that same family (or person) brought him back 10 years later. He was still in the system, just, he was no longer a kitten.

At the shelter, they told me they thought he had arthritis, as evidenced by the way he peed in his litter box there. When I took him to the vet for his initial checkup, they said, don’t worry about it. He was never creaky, although he was cranky after longer naps.

Tweaks loved his heating pad. He was not a fan of being harassed during naps.

One of the first things I bought for tweaks was a bunch of polar fleece blankets. He was never that much of a fan. I also bought him a heating pad because of the arthritis.

If you have an older cat, I highly suggest you get him or her a heating pad.

This is the specific version I got (link to Amazon), the “K&H Pet Products Thermo-Kitty Mat – Heated Mat for Cats – 6 watts – MET Safety Listed”

I would put it away in the summers, when the house would get to hot, but otherwise, it would stay plugged in all the time, on the bed. He loved that thing.

I visited with him in the one-on-one play area and he immediately jumped in my lap. I took him home and initially gave him the run of the house. He quickly hid in the back of the closet of the house I was renting in La Puebla.

With Apricot, I had followed the normal instructions: keep the cat in one room (usually the bathroom) until its acclimated, and then let it explore. Apricot, unlike Tweaks, was incredibly head-strong, brave and rambunctious. She immediately wanted out, and also, she immediately wanted outside.

After a while, Tweaks warmed to the house and either that first night, or maybe a few nights after, he started sleeping on the bed.

I never called Tweaks my “little boy” or “baby” or “child.” I figured that I adopted a full-grown man. At 10, he was 56 in equivalent human years.

I always wondered, and still do, about Tweaks’ early life, and what he was like as a kitten.

Unlike Apricot, Tweaks did not really want to go outside. With Apricot, I tried to let her into the small fenced area in the back of the house but she immediately jumped the fence and went exploring. I would later compromise with her and leave a window open during the day and close it at night. In the early mornings (4-6 a.m.) she would bat me in the face with her paw, demanding to be let out then, after an hour of exploring, come back in.

Tweaks, on the other hand, he liked to sleep in. When I let him into the fenced area, he never tried to jump the fence. He would just sit in the sun and observe.

Later on, when I moved to Espanola, I did not let him outside at all because there was no fence. After a year, I put small fences on either side of the back of my house so he could be outside. He only got out twice. Once, he jumped over the 4-foot-high chicken wire and got into the front yard. The other time, he managed to climb the seven-foot coyote fence at night. I found him on the opposite side, unable to climb back up.

Well, here’s to you Tweaks. I might have only had four years with you, and I was convinced up until your vet appointment that I was going to have another four at least, but the heartbreak, tears, the hurt, was all worth it.

I miss you buddy.


Notes made during the decline

I watched Tweak’s decline and, as it happened, I decided to write down what was happening, to purge a little of the emotion between bouts of bawling. The following is those notes:

Watching Tweaks quickly fade, as he stumbles, refuses to eat, paws at the ground before not drinking water, is incredibly hard.

(Monday morning, he walked over to his water bowl and tried to so viciously paw the ground before a few laps of water, but there was no viciousness there. There was only his failing motor skills, exaggerated motions.)

Pilling him is incredibly hard and it makes me feel like my last moments with him (I am sure that whatever is going on with his liver will be fatal) are going to be bad, bad memories and he will die hating me, even though I am doing what little I can to save his life.

I’m upset that we could have gone the feeding tube route (internet research) but the vet never brought it up and seems to think that it will be fatal irregardless.

I’m upset at myself for, in the middle of crying, thinking about what I will do next, whether or not that’s a coping mechanism.

I know I’m going to lose him and it hurts so much.

On the afternoon of April 29, after one botched pilling/feeding attempt, Tweaks continued to move between the bed, the couch and one of the office chairs.

Then, I went to look for him and found him in the back of the closet.

Although I already suspected that he was not going to make it, that cemented it for me.

I continue to struggle, especially considering the 29th was a Sunday, whether I should try to seek a second opinion and a feeding tube or if I should just recognize that he has a mass on his liver.

One of the things that seems to help me grieving process is reading the personal stories of other people who have lost their pets (cats or dogs) to old age or sickness.

Reading poems about lost pets and the grieving process also seems to be helping. It triggers more emotions, but I feel better afterward. Assisted grieving. Triggered grieving.


Some memories

I wanted to share a few memories of Tweaks, especially before they fall victim to time.

Given a whole couch to sit on, Tweaks would seek out the newsprint.

One of Tweaks’ favorite things was to sit on paper.

It was weird. I never understood why.

I guess it’s good that I work as a newspaper reporter.

Tweaks really liked sitting on paper. Newspaper, sketching paper, glossy paper, it didn’t matter. It didn’t matter if it was on a couch, a lap, a table, the floor. He wanted to sit on paper.

Tweaks had a cat tree and usually when I’d get home in the evening, he would be on the cat tree, staring at the window. As soon as he made eye contact, he would start meowing at me. I could see his jaw moving, even if I couldn’t hear him.

He was a people kitty.

When I had one of the interns from work over, before we went out to La Madera to canvas for a story, he immediately jumped on Jacob’s lap.

Later on, when my dad came to visit, he would stay in the bedroom. I never figured out why he liked Jacob so much.


Learning a pressure cooker, or in my case, an electric pressure cooker (brand Instant Pot) means trying out new recipes and seeing what it can do.

In the case of chicken noodle soup, the answer is a whole hell of a lot.

When I made it, I went online to see what the general suggestions, and recipe directions/ingredients are for chicken noodle soup.

The best suggestion, which I heeded, was to cook the noodles separately because of the difference in required cooking time.

Other included cubing the chicken before cooking it (for people using boneless chicken breasts or thighs) and suggestions on how much broth and water to include in the pot.

Finally, I was reminded that cooking bone-in chicken means leftovers will be a little gelatinous, from the natural binders in the chicken cartilage.

(See just the recipe here.)

Chicken noodle soup made (mostly) in an electric pressure cooker (Instant Pot). Bone-in skin-on chicken legs were used, as well as green chiles (Anaheim peppers).

I didn’t see any particular instructions on what to do with chicken legs.

Chicken legs are probably the cheapest meat I can get and when I went to the store to get ingredients, they were only $1 a pound, by far the best deal in the store.

They also go on sale for $4 for a 10 lb frozen bag.

If you’re looking for a cheap chicken soup, this is it.

I put the metal steam rack in the bottom, put in two chicken legs, the cut veggies (squash, zucchini, carrots and green chiles), poured in six cups (32 ounces) of chicken broth, a little water, half a bullion cube, locked the lid and turned it to 15 minutes .

After it finished cooking, and I allowed it to “natural release” for 15 minutes, I vented the unit and extracted the first chicken leg with a gloved hand and started taking the meat off the bone and putting into a bowl. Once both chicken legs has been stripped of their meat, I threw them back in the pot and started stirring. Meanwhile, I already drained the pasta and, after realizing everything would be easier in a larger pot, I transferred everything to the pot the pasta had been in.

I added the noodles and realized it lacked salt, so, remembering a Cook’s Illustrated I read on the topic, I grabbed my trusty light soy sauce, my trustier fish sauce and seasoned the soup.

Voila!

Unfortunately, for leftovers, the pasta continued to soak up the broth. I was fine with it, but one could have added a little more.

What did I learn?

Chicken legs or (bone-in) thighs work just fine, so long as you’re willing to fish them out, strip the meat off the bones and put it back in the pot.


Pressure cooker chicken noodle soup

Makes 10 servings

Ingredients

2-3 chicken legs (bone in, skin

6 cups chicken stock (48 ounces)

2 cups water

1 bullion cube (optional)

1 lb carrots

1 medium onion (optional)

1 zucchini, Mexican squash, yellow squash or other squash

2-5 green chiles (Anaheim peppers) or other peppers of choice, such as bell peppers or Poblanos.

1/2 to 1 lb pound mushrooms (optional)

Other vegetables as desired, including celery and garlic

Soy sauce to taste

Fish sauce to taste

Pepper to taste

1 lb noodles

Directions

1. Cut all the vegetables into bite-sized pieces.

2. Place the steamer rack at the bottom of the (electric) pressure cooker, then place the chicken legs on top.

3. Put the vegetables in the pot, followed by the chicken stock, the bullion cube (if using) and the water.

4. (Electric) Set the pressure cooker for 15 minutes. Allow for 15 minutes of natural release, and then vent, if desired. If using a stove top pressure cooker, bring to pressure and cook for 15 minutes.

5. While the soup is cooking, in a medium pot, heat water to boiling. Salt the water, then add the noodles and cook as per directions.

6. Once the soup is vented, or the top can be opened, remove one chicken leg at a time and, being careful not to burn your fingers, with a fork, knife or both, remove the meat from the chicken bones. Cut the meat into the desired-sized pieces. Continue with the rest of the chicken legs. Add the meat back to the soup.

7. Drain the pasta and combine with the chicken soup. If desired, transfer the soup from the pressure cooker to the pasta-cooking pot.

8. Season with soy sauce and fish sauce, until soup reaches desired saltiness.

Although I may not be Catholic, that does not mean I’m oblivious to the dietary changes of those around me come February. (This year, it’s Feb. 14).

In that spirit, I thought it would be best to post a round-up of all the Lent-friendly recipes and columns.


Fish

Grilled swai

Fish tacos

Vegetarian

Hummus!

Zhug

Roasted cauliflower

Zucchini fritters

Ugly beans

Tabbouleh

Tzatziki

Mexican-style grilled corn

Roasted carrot coconut salad

Roasted spicy cumin carrots


Easy to make Lent friendly

Rice bowls. Substitute pork for fish or leave out meat entirely.

The finished green chili hummus, after everything has been blended.

I previously wrote about keeping track of records requests in a spreadsheet, something that I encourage every journalist to do. That post has links to sample spreadsheets and various ways of keeping track of requests.

Public records are not the only thing that you can easily keep track of with spreadsheets.

Really, the options are limitless.

For personal use, you can keep track of accounts and user names. You can record all your serial numbers and item descriptions in case your house if burglarized or your stuff is otherwise stolen.

Having serial numbers at the ready makes it much easier for police to recover your stolen property because of national databases.

But working as a journalist, and more specifically as a cops/courts reporter, there are a few specific instances where I use spreadsheets to make my life that much easier.

Tracking criminal cases

Rio Arriba County has a high crime rate, as illustrated by the cases I’m following.

When it comes to being a cops/courts reporter, I keep a bunch of spreadsheets to track everything going on in my beat and, often, to keep track of what went on.

I have one spreadsheet I use to track all the criminal cases I’m covering.

As you can see, Rio Arriba County has a lot of ongoing and serious criminal cases, although one or two of those may be northern Santa Fe County.

Although not shown in the picture to the left, this spreadsheet currently has three sheets: “open,” “closed” and “master.”

The cases pictured are only the open cases. Everything goes into the “master” case list, is then copied to open cases and, when a case hits final adjudication (either through sentencing or the appeals process) it gets moved from open to closed.

The spreadsheet currently has the following sorting columns:

  • Type
  • Defendant Name
  • District  case number (higher court)
  • Offense date
  • Status
  • Victim
  • Ancillary case number (such as the pre-trial detention case number, a civil lawsuit or restraining order)
  • Weapon
  • Magistrate case number (lower court)
  • Report (if I have police reports for the case)
  • Appeal case number
  • Date filed (district court)
  • Date filed (magistrate court)

As shown in the screen shot, type refers to what kind of crime was committed.

I include fields for the date of incident as well as the date filed because the date of incident is a field that moves with court filings as they wend their way through the judicial system. That makes it a necessary number when sorting through court records.

While this does take a small, to moderate, amount of time to set up and initially populate, it’s well worth the time savings later on, the brain-wracking when you can’t remember which case is supposed to go to trial in a few months and from potentially missing important hearings.

While I’ve still missed my fair share of court hearings, keeping a spreadsheet makes it easier for me to check on statuses of everything I’m still covering.

Tracking lawsuits

As the cops and courts reporter, I also cover lawsuits against all our public entities, including the various school districts, our college, the city (and its police department/officers), the county (and the Sheriff’s Office) and even State Police.

Keeping track of all those cases requires a little bit of data entry, but it prevents me from forgetting about cases entirely.

Moreover, spreadsheets can have formulas which means you can keep a running tally for how much a specific entity has paid out in settlement agreements and court decisions.

It also means you can make a new “sheet” or tab in your spreadsheet, dump in all the lawsuits that name a specific person (think of individual officers named in civil rights lawsuits, or all of the lawsuits arising under a specific chief or president’s tenure, or all the lawsuits that are whistleblower claims) and create a simple formula to add up all the amounts.

Keeping a spreadsheet of lawsuits (I break mine down into groups, such as “city,” “county,” “state” and “schools”) also serves the same purpose as my spreadsheet keeping track of criminal cases: it helps me not forget about cases.

Tracking death (overdoses, suicides, etc.)

Once a year, I go to the Office of the Medical Investigator to photograph all of the autopsy reports for Rio Arriba County for the previous year.

It usually takes a few hours to take the pictures and then quite a few more to sort everything.

Each year’s overdose spreadsheet has lots and lots of sub-sheets. I didn’t even mention pivot tables, and the massive things you can do with them.

Once all the reports are sorted into their respective folders and sub-folders,  I start adding all the names to a spreadsheet, along with the day of death, the year of birth, age at the time of death, agency that handled the investigation, the place of death and a bunch more fields related to alcohol and prescription drugs.

I also have one column for all the drugs the person overdosed on. I also break these out into another sheet, with one drug per row.

That spreadsheet helps me with a couple of different aspects of reporting the story.

When I’m writing it, it’s pretty easy to crunch the numbers of how many deaths involved what drug or what drug combinations (as seen in my story on the number of deaths in 2014).  In 2016, for 2015’s deaths, I did the same thing:

Heroin continued its trend of being involved in a majority of overdoses. It was involved in 17 of the 24 deaths, or 70 percent. Three deaths were caused by heroin, alone.

Opiates garnered an even larger portion, being involved in 20 of the 23 deaths, or 87 percent. Heroin is an opiate.

The third most-involved drug was alcohol, contributing to 13 deaths, or 54 percent. Alcohol-only overdoses were not counted.

Prescription drugs, including the opiate methadone, were responsible for nine deaths, or 37 percent, while cocaine was involved in six, or 25 percent.

Having those spreadsheets handy also makes it easier for me to figure out what police reports I still need to request for which deaths.

I can also sort the sheet by age, by drug, by date of death or by location.

It makes reporting the story much easier.

Sorting salaries

Every October, we run the salaries for all the entities we cover.

That means going through whatever document has been provided and updating/adding to our salary list document from last year with new salaries, positions and deleting employees no longer there.

Doing this is easy when the salaries are provided as a spreadsheet.

Doing this is hard when the salaries are provided in a PDF. There are a few different solutions, depending on the layout of the document you were provided, but the point is to get them into a spreadsheet for future reference.

Even if your paper doesn’t run salary lists, it’s still a very good idea, once or twice a year, to request them.

There are a lot of things you can do with that data, including looking for pay discrepancies, but they are really important as reference documents.

Not sure how to spell that employee’s name? Salary list.

Someone got put on admin leave with pay? Salary list states how much he makes and you can then calculate how much he is being paid not to work, per week, per month, etc.

Someone got fired? Salary list states how much he made.

Tracking award entries

If you’re anything like me, your boss comes into the newsroom and says that you have a month to get him your contest entries for the state’s annual newspaper contest, and you then scramble to figure out what you’ve written in the last year that warrants entry.

My contest entry spreadsheet is tailored to New Mexico’s better newspaper contest and the way my paper keeps its archives. None of these entries won during the 2016-2017 contest period. I won second place for news writing.

There is a better way!

Instead of scrambling in June or July, and looking through old PDFs, paper copies and your pre-production text documents, you can keep track of everything you want to enter in a simple spreadsheet.

You only need a few columns to keep track of everything important:

  • Headline
  • Date (run)
  • Content (story vs series vs photo)
  • Continuing
  • Other dates
  • Location (in paper)
  • Collaborators
  • Contest category

The most important part of keeping track of contest entries is to put them into the spreadsheet shortly after the story runs so, at the end of the contest period, you can go back and cull what you think are the best entries to submit.

In the case of continuing coverage, it’s very important to update your entry with the new story dates because if you don’t, you’ll be scratching your head and asking your editor who has the better memory for all the stories that ran as a result of whichever broader story.

This post is licensed under a Creative Commons Attribution-Only 4.0 license.

Cranberry sauce (or relish) is usually a dish reserved for Thanksgiving, Christmas and any other time you’re serving a turkey.

Whatever the occasion, cranberry sauce is one of the dishes you should make before before roasting the turkey, along with stuffing and most of the gravy.

Now, before you entirely discount this recipe, I can attest that it was one of the biggest hits from Thanksgiving 2017. The fact that spice is a part of what would normally be a sweet dish adds some to the allure.

It’s also very easy, although how cheap depends on if you can get cranberries on sale.

It’s mostly about the taste, but somewhat about the presentation.

It’s essentially your regular cranberry sauce recipe (which will gel in the refrigerator) with the addition of lemon and lime juice, a little ginger and some jalapeños.

(more…)

Whenever someone asks, “What’s a healthy recipe that’s easy and I can snack on?” I have a stock reply.

Hummus. (See just the recipe here).

It’s easy, it’s healthy, it’s delicious and it can go with vegetables, bread, with other sauces, or be served as a spread.

So, what is hummus and why should you make it at home?

Hummus is a mix of cooked and crushed chickpeas, also called garbanzo beans, with tahini, also known as sesame seed paste.

There are some other ingredients: lemon juice and salt, as well as a host of optional ingredients including garlic, peppers, artichoke hearts and other seasonings.

Mainly though, it’s just cooked chickpeas and tahini, blended together.

Things can get a little bit more complicated if you’re willing to take the extra step (frugal and healthy) of cooking the chickpeas yourself.

Even then, hummus is a super simple recipe.

It’s also cheap.

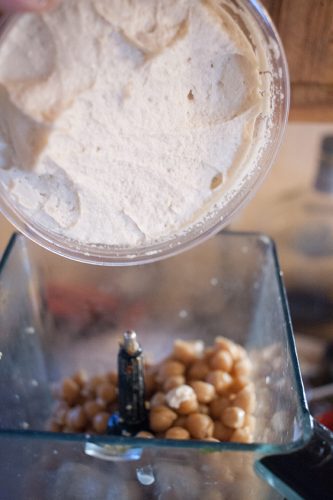
Adding the chickpeas to the blender.

Normally, stores sell 8-16 ounces of hummus for $3 to $8.

You need eight ounces of tahini for this recipe which sells for $3. The pound of dried chickpeas is another dollar.

It makes a full 72-ounce blender full, which is a decent return on investment.

Most of the time, I do not eat it fast enough and it begins to ferment. Not go bad, per se, but you can tell it’s fermenting after 10 days or so, despite all the lemon and lime juice in it.

This is also a great recipe if you want to take the first step toward cooking your own beans, instead of buying them in the can.

It’s forgiving, it’s delicious and no one will know they’re eating beans.

I’ve included instructions for both electric pressure cooker users (such as the InstantPot) as well as those using a slow cooker.

The finished green chili hummus, after everything has been blended.

You could also cook the beans on the stove, but I prefer one of the two plug in methods.

Because hummus is so simple, and its basic ingredients are so few, it is a type of blank slate dish that can take on any number of additional flavors.

My favorites are roasted green chiles (a New Mexico favorite) and marinated artichoke hearts. Take a look at the commercial hummus being sold in your local store: there’s pimento hummus, there’s hummus with dill, there’s hummus with ingredients it shouldn’t be paired with.


Goes-with-everything hummus

This hummus can be jazzed up with most anything and goes great as a side and as a dip.
Course: Side Dish
Cuisine: Mediterranean
Keyword: dip, sauce
Servings: 72 ounces
Author: Wheeler Cowperthwaite
Cost: $5

Equipment

  • Blender

Ingredients

  • 1 pound dry chickpeas or 7 cups cooked/canned chickpeas also called garbanzo beans
  • 8 ounces tahini
  • 2 tablespoons lime juice
  • 2 tablespoons olive oil
  • 3 tablespoons chopped garlic more to taste
  • Salt to taste
  • 1/3 cup reserved chickpea cooking water
  • Artichoke hearts (optional)
  • Chopped green chile, roasted or unroasted (optional)
  • Chopped peppers (optional)

Instructions

  • Soak the chickpeas overnight in cold water at a rate of three times the quantity of water to chickpeas.
  • If cooking the chickpeas in a slow cooker, cook on low for 5 to 8 hours. Make sure the chickpeas are covered with water.
  • If cooking the chickpeas in an electric pressure cooker, cover with 3-4 inches of water and set for 15-20 minutes, or 20-25 minutes on beans.
  • Drain the chickpeas, reserving 1⁄3 cup of the cooking water.
  • Add 2⁄3 of the chickpeas (or all, to make a creamier hummus) into a blender or food processor, along with the lemon juice. When blending, a little more liquid can help facilitate the process. Add a few tablespoons of cooking water as needed.
  • Add the tahini and continue blend until everything is mixed. Once the chickpeas blend with the tahini, the color should change to a lighter shade of yellow.
  • Decant the mixture into a mixing bowl and add into the blender the garlic, the lime juice, the olive oil and, if using, the artichoke hearts or other ingredients and blend. Add the new mixture into the mixing bowl and stir until well combined.
  • Add salt, or garlic salt, to taste. Start with two teaspoons. Just enough salt will make the flavors of the hummus pop.
  • Add the rest of the chickpeas, either only briefly blended or whole, depending on texture desires.
  • Refrigerate or enjoy immediately, The hummus will get just a little bit better and thicken after it has been refrigerated.


See just the recipe here.

See the full album of photos on Flickr.


The cooked chickpeas (garbanzo beans) after they have been strained. The flecks of red are from red chiles they cooked with.


Lemon juice helps the blending process and adds a necessary acidity.


I add garlic (chopped) to the blender before adding the garbanzo beans.


Roasted green chiles, before they are diced and thrown into the blender. They were roasted on the barbecue.


You can get the perishable Trader Joe’s tahini sauce ($2.99 per 8 oz container) or get a larger container at an Asian market.


The tahini (sesame seed paste) is added on top of the chickpeas, in the blender.


The finished green chili hummus, after everything has been blended.

Find the stand-alone recipe here.

Sometimes, great things come from the lowly grill at your local gas station.

That is the case with the corned beef hash burrito, originally hailing from the Triple S gas station in Española.

Uniquely New Mexican and a delicious fusion, there is nothing quite like it.

I was first introduced to this fusion by a co-worker who announced to the newsroom that he was going to get one at the gas station.

Soon, I went to discover this invention myself. I can vouch: it’s amazing.

Here in New Mexico, you will always be asked if you want red, green, or nothing. This refers to green chile and red chile. If you want both, it’s called Christmas.

This version leaves the chile choices up to you. I decided to chop up and lightly cook a green chile for the burrito. Normally I would have paired it with salsa and the secret sauce I use for grilled corn and fish tacos, but I was out of both.

There are quite a few moving parts to this recipe.

First, the corned beef hash. I used the canned kind because I haven’t made corned beef in a while. If I had, the hash is pretty easy to make. Finely dice everything (cabbage, potatoes, corned beef) and throw it in the skillet to fry up.

Either way, it fries in the skillet.

Next are the diced potatoes, which are optional.

Since I now have an InstantPot, the brand name for a type of electric pressure cooker, I cooked the potatoes the night before. First, I cooked them for five minutes, which left them a little too hard. I cooked them again for two minutes, which made them a little too soft. The next morning, I diced a few of them, then threw them in a skillet with some oil, salted liberally, and let them fry.

The electric pressure cooker makes steaming/boiling potatoes so much easier than if I had to cook them in a pot on the stove.

Meanwhile, I had a little under a pound of black beans soaking in water since the day before. The morning I wanted to make the corned beef hash, dumped the water the beans had been soaking in, put them in the electric pressure with a bullion cube and let them cook for 15 minutes on high pressure.

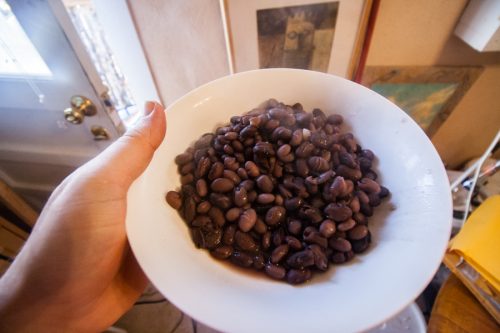
The black beans, after they’ve been cooked in the electric pressure cooker, and before they’re thrown in the skillet to lose any extra liquid.

Lots of people say you can just throw dry beans in the pressure cooker, it just takes more time. I prefer to soak the beans.

You might think this means the beans are done in 15 minutes. It doesn’t. It’s much closer to an hour, between the time it takes to heat the pot and bring it to pressure, as well as the time it takes to naturally release the pressure. Still, an hour without any babysitting the pot isn’t bad.

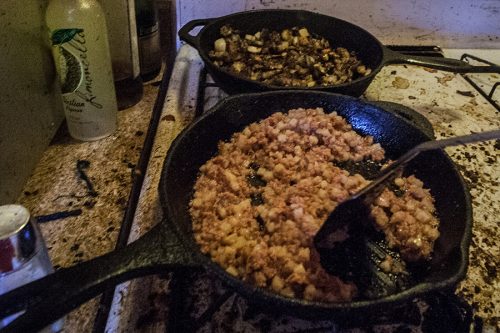
Potatoes: cooking. Beans: cooking. Corned beef hash: cooking.

The corned beef hash (front) and potatoes (back).

Next up is the green chile. Chop it up and throw it in a hot skillet for a few minutes.

In hindsight, I probably should have added some eggs, either fried and on top of the burrito, and cooked and put inside the burrito, but I didn’t think of it at the time.

When it comes to the burrito, it needs to be large enough to allow for all of the ingredients. Often, packages will state “burrito size.”

So, go make yourself a corned beef hash burrito! You will be amazed at how delicious it is.

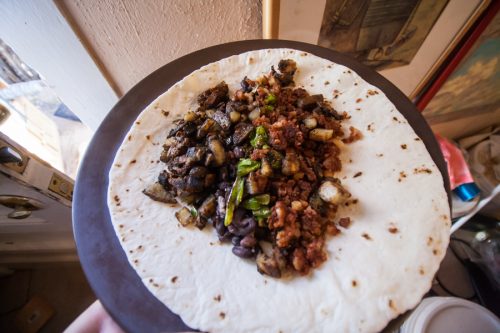
The burrito before rolling. Left to right: Pan-fried potatoes, black beans, green chile, corned beef hash.

Find the rest of the photos here on Flickr.


Corned beef hash breakfast burrito

A staple of New Mexican gas stations, the corned beef breakfast burrito is a wonderful fusion
Prep Time30 minutes
Cook Time30 minutes
Total Time1 hour
Course: Breakfast
Cuisine: American, Fusion, New Mexican
Keyword: burrito
Servings: 2 burritos
Author: Wheeler Cowperthwaite

Ingredients

  • 1-2 eggs scrambled or fried
  • Milk if making scrambled eggs
  • 1-3 green chiles diced
  • 1 can corned beef hash or hash made from slow cooked corned beef
  • 2-4 ounces cooked black beans
  • 3 diced potatoes
  • 2 Burrito-sized tortillas
  • Red chile prepared (optional)
  • secret sauce optional

Instructions

  • Cook the beans, or buy canned beans.
  • Steam or boil potatoes until tender
  • Heat a skillet over medium high heat. Put the hash into the skillet and cook until it begins to lightly brown.
  • Either remove the corned beef hash to container and add the diced potatoes, with some oil, or heat another skillet on high, add a little oil, and toss in the diced potatoes. Shake salt over the potatoes and cook until lightly brown.
  • Cook the eggs and remove to plate or bowl when done.
  • Cook the beans in a skillet with a dab of oil, briefly, to remove excess liquid
  • Briefly heat the first tortilla in the microwave or in the skillet, until just a little warm and pliable.
  • Add the ingredients you’re using to the center of the tortilla, including the hash, potatoes, eggs, beans, chile and anything else, roll, and serve with red chile, salsa, sauce and garnish with lime slices.

23. Have your Viber and WhatsApp accounts already created

If you’re a solo traveler on a short trip like me, or going on a longer adventure, you should sign up for Viber and WhatsApp before you leave.

A lot of the people you meet, both locals and travelers, are going to be using one or the other for communication. Remember, you switched your SIM cards at the airport and there’s no more texting from your US phone number, for the duration of your trip.

(Unless you use Google Voice: I was still able to text people from my phone, and computer, with my normal phone number. That’s because I use Google Voice instead of my phone on-board number. Because Google Voice is an application that sends text over the internet, I could still send and receive texts like normal. However, that is a choice I made many years ago, when I changed numbers.)

That’s where Viber and WhatsApp come in, especially when you want to text your new-found friend what time you’re going to catch the bus, or if they want to go to dinner, or anything else.

You can always email, but that’s so much clunkier.

I personally learned the lesson the hard way (in 2016) when I had to sign up for both types of accounts with my Vietnam phone number, and then try to switch everything back over to my US number.

See all the travel lessons here.

22. Be prepared to haggle

For the most part, in Southeast Asia, you’re going to have to haggle.

Not so in restaurants (fixed prices) or convenience stores (the same) but for the most part, be prepared to haggle.

It often helps to either know what other people are charging for similar goods or what the price should be in general.

See a nice backpack? Ask one of the travelers you’ve met what they paid. Use that to gauge what you should be paying.

One of the main markets in Ho Chi Minh City on Dec. 5, 2016. When going to a market, be prepared to haggle!

In addition, you should be prepared to walk away.

A lot of the time, vendors will quote you prices that might as well be the full retail when you walk into any store in the United States. Totally unacceptable. That’s when you walk away.

The vendor should came back with a better price and begin negotiations again. If not, it’s time to move on.

Other things to consider when haggling is buying multiple items to bring the price down.

Since I’m a big fan of bringing back really nice scarfs, when I find a vendor who has the wares I want, I ask how much. We go through the haggling rigmarole. When I’ve finally got the price down, I’ll say, what if I buy five, or 10? That should bring the price down even more.

Be prepared to have your calculator out (presumably your phone) and I also suggest having a currency converter app on your phone.

(When communication breaks down, use your calculator to quote prices.)

Other ways to politely talk a vendor out of an extreme price: I’m a student, I’m poor or, my favorite, I’m a poor journalist.

Sometimes, in especially tourist-filled areas, the vendor just doesn’t care, especially if you’re only buying something because you need it right now. In that case, just walk away.

It’s raining and you want to buy an umbrella, or a poncho? Sky high prices. It’s not raining? Reasonable price.

If you think it’s going to rain, or if it’s been rainy, then make sure to buy the umbrella when it’s nice out.

Did I mention an umbrella? If you’re in a rainy season, or area, or there’s a storm coming in, buy a nice umbrella. Spend a few extra dollars because, trust me, it’s worth it.

Just remember: you’re not made of money.

Find all of the travel lessons curated here.

A boy smokes something, Dec. 8, 2016, on the streets of Hanoi, Vietnam.

If you’re a journalist like me, you have a lot of records requests pending at any one time.

If you’re not already keeping track of them in a spreadsheet or similar fashion, this article is to show you how it can be easily done, offer up a template, examples, and some organizational tips.

When I first started out, I didn’t know much about record requests.

That all changed when I started working at the Rio Grande SUN. Now, filing record requests is second nature.

A spreadsheet for open records requests makes it so much easier to keep track of everything.

Since I’m in New Mexico, it’s a lot easier than most states. New Mexico has a very requester-friendly open records law that allows for free inspections of records and offers few exemptions for public officials to withhold records.

That does not preclude me from filing FOIA, or Freedom of Information Act, requests with public agencies, although those requests compose just a fraction of my work. (My FOIA spreadsheet is just a copy of my IPRA spreadsheet that I modified.)

Keeping track of all of those requests, their statuses, when they were filed and all of the other important information can be somewhat easy, but it takes a little bit of organization, a spreadsheet and the determination to keep the spreadsheet updated.

As an example, I currently have 148 (as of June 4, 2017) open records requests. Keeping track of all of those demands some sort of organization.

I’ve only come to the helpfulness of spreadsheets in the past two or three years. Before, I always thought spreadsheets were for things that dealt with numbers. For everything else, I would use a normal text document.

For records requests, I used to just not do anything, other than a search through my email. Oh, how wrong I was!

So, let’s dive straight into the spreadsheet.

(Personally, I use Sheets in Google Docs, mostly because it is available wherever I log into my Google account. Attached at the end of this post is also an Excel version of my template as well as the example spreadsheet.)

Rows upon rows

Before I go any further, please remember, spreadsheets are a somewhat personal thing. I suggest you use a spreadsheet to keep track of your requests, but you should format the spreadsheet’s rows or columns to match what information you want to access.

The first row I use to sort requests is agency. This could be replaced with date, depending on your personal preferences.

Next is the date the request was sent. This is very important because it dictates deadlines and how late a request is in being fufilled. Plus, it’s a great row to sort by.

Everyone needs the first four rows (date, agency, documents requested and status) for a records request spreadsheet. Everything after that is what data you need to help keep track of your requests.

As an aside, when I send requests, I put the date I’m sending the request at the end of the email subject line. I use this as a sort of master reference point when trying to find the string of emails attached to the request.

I also make sure to put a very brief summary of the content of the request in my subject line. This, just like a date, adds another reference point.

An example of a subject line, which I condense for the spreadsheet:

IPRA – May 8 incident reports, supplemental reports, investigative reports, audio/video from incident & communications from — 5-28-2015

The next row is the request’s status, along with the last date  of the last status, if it exists. If an agency sent the three-day letter (mandated in New Mexico law) on May 1, 2017, then I write: “3-day letter 5-1-2017.”

(more…)