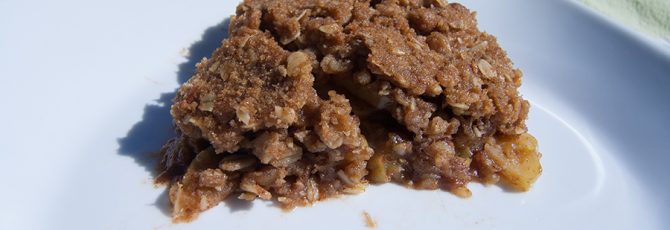
Boozy apple crisp

I’m a big fan of the apple crisp. That should come as no surprise, considering I written about two crisps/hybrids and consistently use the crisp (aka crumble) topping as a basis in other recipes.

There’s the original, double sided crisp which is just a crisp on both the top and bottom and then there’s the hybrid cobbler crisp with raspberries.

I’ve since used the crumble/crisp topping in an apple coffee cake (the crumble/crisp is also called a streusel). It’s the search for inspiration for that coffee cake that brought me to a recipe by Monique at the Ambitious Kitchen.

There were two things I took away from her recipe, both of which I incorporated into the apple coffee cake: the addition of liquor in the baking process and mixing the streusel topping into the middle.

I recently made the Ambitious Kitchen crisp with the addition of, and more, liquor than called for in the original recipe and eliminated the nuts.

I also substituted my streusel topping for hers, which I found to have too much sugar. Finally, I used semi-sweet apples from my co-worker’s orchard.

Finally, I didn’t deal with the the vanilla bean the recipe and conceded to the use of butter on the apples. I don’t know that it added anything and I found the apples needed a bit more sugar.

My last note is that it really does need to be heated back up before serving and it might actually be better a day later, after being reheated.

With that, I give you my modified recipe:

(If you want just the recipe, it’s on my website, here.)

Ingredients

Streusel topping

1/2 cup (1 stick) melted butter

3/4 cup packed brown sugar

1 cup whole wheat flour

1 cup oats

1+ teaspoon ground cinnamon

1+ teaspoon ground/powdered ginger

The apple filling

Optional: 1 stick (1/2 cup) unsalted butter

1 teaspoon to 1 tablespoon vanilla extract

6 medium-sized Granny Smith apples to 5 pounds, cored and very thinly sliced

1/3 to 1/2 cup dark brown sugar

1+ tsp. cinnamon

1+ teaspoon ground/powdered ginger

1/4 cup spiced rum

1/4 cup brandy

Directions

Preheat oven to 350 degrees F. Grease a 9×13 pan.

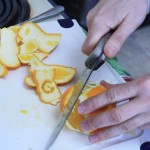
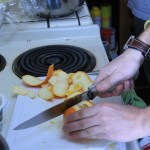
Peel the apples if desired. Cut the apples into very thin slices.

Melt the butter for the streudel topping. In a medium-large bowl, mix the bottom’s melted butter, brown sugar, flour and, if using them, spices. Mix in the oats.

Place the apple slices, the 1/3 to 1/2 cup brown sugar, cinnamon and liquor in a very large bowl and toss to combine.

Take 1/2 cup of the streudel topping and mix it into the apples.

Pour the apples into the greased pan.

Cover the apples with the rest of the streudel mixture and lightly pat down.

Either put the pan on a baking sheet, or put it directly in the oven, and bake for 50 minutes to 60 minutes (an hour).

(Recipe adapted from the Ambitious Kitchen, “The best apple crisp you’ll ever have.”)

boozy-apple-crisp-1-of-8-900x600

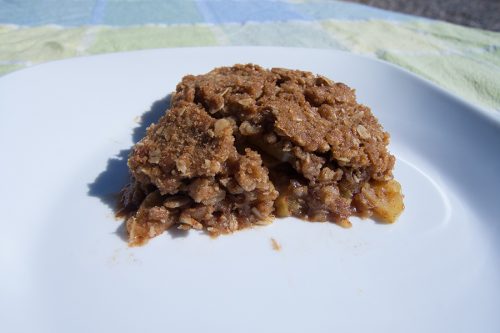
This spiced apple crisp, baked with booze, gets better after the first couple of days. Serve warm or hot.


See, use, whatever you want, because all the photos are here on Flickr.

Making sushi rice

There are two subjects here: the rice used in sushi and how to prepare that rice, once cooked, into sushi rice.

Pouring the rice into the rice cooker.

The first deals with brands and varieties, that is, what type of rice to use. The second is purely recipe and technique, that is, how to make the sushi, or vinegared, rice.

By no means do I claim, proclaim, profane or otherwise pretend to be some kind of expert on rice, sushi, or the rice used in sushi. However, the topic has been written about multiple times. My takeaway was Kokuho Rose. I’ve grown so fond of it that I had to take a more cost-effective solution to buying it, mainly, 40 pound bags. It’s become my favorite white rice.

My default brown (long grain) rice is whichever five pound bag of (brown) jasmine rice I’m currently working through.

The great thing about making vinegared, or sushi, rice is it goes fantastic in rice bowls or really, anything. Then again, I like vinegar.

The rice question

The basics are, the rice used in sushi is either medium or short grain. If you look on the internet, you will find that the answers go either way. Koda Farms, who grows Kokuho Rose (a variety only grown by them) claims that short grain is should never be used. The Kitchn proclaims short grain is sushi rice.

So, this is all confusing. Japanese style medium-grain or short grain rice seems to be the answer. (Japan, for the most part, does not export its rice).

Try out different varieties/brands and find what you like. I know what I like. (I buy the stuff in the red/pink packaging).

Making sushi rice

When it comes to making the rice, I suggest using a rice cooker, especially because they are both so cheap and because they make cooking rice so easy, and perfect.

But what makes vinegared, or sushi, rice, special? The vinegar! And sugar. And salt.

(Use a rice cooker. Seriously. So much easier.)

So, you get your rice cooking (for what I use, the ratio is 1 and 1/4 cups water to 1 cup rice, meaning, for two cups of uncooked rice, you need 1 and 1/2 cups water in the rice cooker) and then move on to making the vinegar solution.

For the purposes of this post, as well as the recipe, the quantity will be two cups of uncooked rice.

I’ve found that heating the vinegar up in the microwave is the easiest way of getting the sugar (1/4 cup) and the salt to dissolve. It should be noted, however, that I just wing it with the salt and sugar. I literally just pour some of both in and call it good.

Another point of confusion is the washing of the rice. Many claim this is essential. I notice no difference with the rice I buy.

All that being written, here’s how to make sushi (vinegared) rice.

For just the recipe, it’s housed on the main website, here.

Ingredients

2 cups uncooked rice

2 1/2 cups water

1/4 cup sugar

1/2 cup rice vinegar

1 tablespoon salt

Directions

In a measuring cup, mete out 2 cups of uncooked rice

Wash the rice if desired, until water runs clear.

Pour uncooked rice into rice cooker.

In a measuring cup, Measure out 2 and 1/2 cups water. Pout into rice cooker.

Close rice cooker and turn on.

While the rice cooks, measure out 1/2 a cup of rice vinegar in a microwave-proof container, if possible.

Add the sugar and salt to the vinegar. Mix to combine.

Heat the vinegar up in the microwave, while mixing periodically, until all the sugar and salt is dissolved. Once dissolved, move it to the freezer while waiting for the rice to finish cooking.

Once the rice cooker either turns off or turns to warm, allow it to sit undisturbed for 5-15 minutes.

Open the rice cooker and quickly mix the rice one or twice. Replace the lid and wait another 5 minutes.

Remove rice from cooker into a large non-reactive bowl.

Pour the vinegar mixture over the rice and, with your rice spoon/mixer (oversized, flat spoon), lightly mix with a forward-pushing motion.

If making sushi, cover bowl with a wet towel and allow to cool further. If consuming rice bowls, consume!

See, or download, all the full-quality photos on Flickr.

(more…)

Glühwein

I moved to Germany shortly after the beginning of the new year, 2010. That meant I was exposed to Glühwein (hot mulled wine) for the first time, although it became much more relevant and loved later on, during my first full winter in Dresden.

Way too hot. My bad! No boiling allowed!

Way too hot. My bad! No boiling allowed!

A friend recently asked for my Glühwein recipe and I realized, my recipe and column are behind a paywall at my former newspaper. Alas. However, I did manage to save the recipe, listed below.


For 1 liter of Glühwein

Ingredients

1 liter red wine, usually a heartier red, although I suggest staying away from Cabernet Sauvignon. Cheaper is usually better because the mulling decimates the nuance of the wine. Decent boxed wine or jug wine often works wonders on the palate, the brain and the wallet.

1 cup orange juice

2 round orange slices

2 full cinnamon sticks (4 half-sticks)

10 allspice (1-2 teaspoons ground)

10 cloves (1-1 ½ ground)

½ a Staranise

3 Tablespoons lemon juice

½ a nutmeg

3 cardamon pods, opened

5 half-inch slices of fresh ginger, quartered

⅛-1/4 cup sugar

Directions

Put all the ingredients in a pot on low heat with a lid on or partially on for 1-3 hours. If the mixture begins to boil, remove the lid momentarily. The key to mulling is to heat up the ingredients without boiling off the alcohol.

The below pictures in full quality, on Flickr.

It was Friday, which meant the Hispanic grocery on Wells, Marketon, was having its one day sale. I looked at the ad and lo and behold, Swai was on sale. However, I had no idea what Swai is so I looked the confusion fish up.

The Iridescent shark (it’s not a shark) is actually a type of catfish (shark catfish, Wikipedia says.) It is, however, packaged as “swai.” Three names: iridescent shark, swai, and catfish. It’s a native to fresh water in southeast Asia.

Speaking of, which, one of its relatives, the Wels Catfish, is reported to jump out and eat pigeons. If only we had them in our fountains.

At $1.99/lb, I figured they must taste decent enough and if they’re anything like their North American cousins, the flesh should stand the test of the grill. So, I bought two packages, totaling 7.89 pounds. The fillets I bought were huge, the length of a small cookie sheet. I poured lemon juice on it, threw on some lemon pepper, pepper and garlic salt and let it sit for half an hour before throwing it on the grill.

The plain recipe is: here.

(more…)

This article was originally posted on June 10, 2013 on my homebrew website, Fat Grey Tom’s Cider. It has been re-posted here with the same time stamp.

Bryce has wanted an IPA for a long time and we have tried on multiple occasions. On these other occasions we have failed and created pale ales that were not of the India stature. This last time we tried, though, we knocked it out of the park. Well, not really. It’s really bitter though.

Leo and I went to the brew store at some point before April 6 (when we brewed it) and he picked out the ingredients, including many hops. We had an uneventful brew day — nothing in particular went wrong. We had even more hops lined up, sitting in a container in my refrigerator, but did not use them this time around. I’m not sure exactly what the hops are anymore: they were the hop pellets of brews past that kept on spilling out, the tops of their baggies cut away along with their identities.

I’ve no doubt they’ll begin to haunt me and my dreams.

We used the London ESB ale yeast, which seemed to be very tolerant.

One can see where the foam was at the top of the mug before settling down into a manageable head.

We let it sit, with much hop sediment, for over a month (closer to two months) before we kegged it. We first secondaried it and then finally kegged it. The beer is still cloudy, unlike the ciders which always seem to clear irregardless.

As it has aged in the keg, it has begun to foam more and more than it did when it was first put in, becoming harder to pour and the head is retained for one to five minutes before settling down.

On its head, there is a large amount of bitterness and underneath is a strong pale ale pedigree. The aroma is there, although it could be more, as could the hops taste itself. But, it is damn bitter. If you like bitter.

One of the problems I have found as a homebrewer is once one (Bryce) walked down the path of IPAs, his pallet seemed to be perpetually cleansed of the ability to taste any beer that was not heavily hopped. Alas, alas.

INGREDIENTS

1 lb. Caramel 60 L
1 lb Honey malt
6.6 lb light LME (liquid malt extract)
3 oz Northern Brewer
2 oz Nugget
2 oz Cascade
1 oz Czech Spaz

HOP SCHEDULE

60 minutes
3 oz Northern Brewer
2 oz Nugget

30 minutes
2 oz Cascade
2 oz Czech Spaz


I love fish, which seems to be a shame considering I was born and raised in the inland desert. While smoked salmon was a treat growing up, it has always been an unaffordable luxury in my adult life. Fortunately, there are many alternatives, including one of my favorite fish: the sardine.

Two of the three sardines in a can sit on English muffin halves, straight from the can.

Two of the three sardines in a can sit on English muffin halves, straight from the can.

Lightly smoked canned sardines may not have the exact taste, or consistency, that smoked salmon does. They certainly do not have the nice presentation it does. However, they are cheap (around a dollar a can for three sardines) and make for sustainable and delicious cheap eats.

 In this case, I have been using English muffins as the base, although bagels or bread would certainly work as well. That and some cream cheese. Two adjuncts, capers and red chopped red onions, as seen in cream cheese and lox preparations, make good companions. Sometimes I like them, sometimes I like it plain.

That’s all there is to it. Kippered herring is also a good choice, as are other smoked canned fish.

Three sardines come in a can but usually one sardine is sufficient to cover an English muffin so I save the third for the next day.

The sardines' supple flesh has been spread over the muffins.

The sardines’ supple flesh have been spread over the muffins.

Since I’ve been unfortunately bereft of cash, I’ve moved much of my diet over to the produce that’s on sale for the week and brown rice. Brown jasmine rice, to be exact. The other part of my diet is using up whatever I have in the refrigerator. Recently it has been small dill pickles.

Eating so much rice quickly (soon I will move on the quinoa and the bulgur wheat I have stored) means I have to mix up what I’m doing with the rice. Early in the month, I made a conglomeration of black beans (I had cooked in the slower cooker,) chorizo and brown rice with ample amounts of onions, (home-made) salsa and Taptio (not home made.)

Curry rice with a wee bit of cilantro on top.

Curry rice with a wee bit of cilantro on top.

I then moved on to the stir-fry route with a failed General Tso’s chicken, made with broccoli. The sauce (made with apricot preserves) did not come out at all. (The point of the dish, to me, is the sauce, not the meat.) I considered it a failure. That left me with extra rice and no eggs. I didn’t want to just fry the rice — no eggs. Instead, I dug through the quickly-emptying refrigerator for my big container of yellow curry paste. Two pounds, to be exact, of spicy goodness. I poured some oil into the cast-iron skillet, put the curry in, let it disintegrate some and then threw in the rice.

Curry paste

Curry paste!

Had I other vegetables, or had I remembered the just-bought sack of onions sitting with the potatoes, I would have thrown them in. Good contenders range from potatoes to eggplant to broccoli and sprouts, peppers and tomatoes and squash. I then made a hole in the center of the rice, cracked for eggs, cooked and mixed them into the rice. I cut up cilantro I had bought for the purpose and threw it in, leaving a little extra to be used as a un-cooked garnish.

It serves its purpose. Now only, if I had vegetables left.

If you’re looking for a little extra somethin’-somethin’, then consider making some dill-heavy tzatziki to go with the curried rice.

This article was originally posted on March 29, 2013 on my homebrew website, Fat Grey Tom’s Cider. It has been re-posted here with the same time stamp.

Leo, Bryce and I are products of the late 80s and early 90s. When we were born has informed both our choices in diction and our nomenclature decisions, aka, references. The banality of evil is certainly, to a degree and extent, borne out of the History Channel of our childhood’s and its devotion to World War II. Certainly, the time I spent in Germany and my obsession with the German language and culture has influenced both our brewing and our terms, too.

Leo has said the three of us make up, through our various quirks and proclivities, interests and designs, gesticulations and interests, a single 1950s wife.

What this has to do with beer should certainly be explained: Leo wanted to make a domestic (American) golden ale. Not even a pale ale with its higher alcohol content, but rather, a domestic American beer. He made up the recipe extemporaneously at our local homebrew store. The beer was supposed to be a domestic. Together, we three brewing brothers, make up . . . domesticity itself. I’ve been told countless times I’d make a very good wife to some man some day, because of my love of cooking, of hosting, child-rearing, etc. Not to say I disagree. I don’t doubt I’d make a great housewife. I even love a good soap opera, albeit, in German, the language of true Liebe.

When it came to brewing Voltron, the three of us combined into . . .

We wrote the ingredients down and the process was the same as always, except we did not write the yeast down. We’ve assumed, through elimination and cross reference with the one-gallon cider batches fermenting in my closet, that the yeast was the Burton Ale Yeast from White Labs but we’re not sure. Maybe it’s the London Ale Yeast.

Regardless of which yeast it is, the beer itself (a truly beautiful amber color) has been infected. It’s not a bad infection, it’s a pleasant, sour infection but an infection none-the-less.

The beer is carbonated and kegged and has been quite a hit so far, although, it seems everything in the keg that doesn’t taste terrible is a hit.

The plan is to culture whatever we managed to create and both remake that recipe and also make something new. It’s a good infection, one we can harness into a whole new yeast strain and possibly bacteria strain through washing and culturing. Next up for that combination, we’re thinking, is something with fruit.
This is for a five-gallon batch.

Ingredients:
1 lb caramel 60L
1/2 lb Caramunich
1/2 lb flaked barely

6.6 lbs light liquid malt extract

Hops:
1 oz Fuggles
1 oz Cascade

There you have it. The Voltron. (We’re not sure what the hops schedule is so . . . Make it up.)

The Voltron in low light

The Voltron in low light.


This article was originally posted on March 25, 2013 on my homebrew website, Fat Grey Tom’s Cider. It has been re-posted here with the same time stamp.

One of our local homebrew stores was having a sale on yeasts a month, or maybe longer, ago. The yeasts were about to go out of date so they were marked down and low and behold, they were not many common yeasts. In fact, they were all White Labs vials, four of them to be exact. So, I figured if we didn’t use them immediately for beers, we could also use them in a ciders before they went and and see what happened and then wash the yeast, and reuse it when we’re ready to make X, Y or Z with them.

Our recipe is as follows:

  • 4-ish gallons of Great Value Apple Juice
  • 730 grams of corn sugar (2 lbs per 5 gallons, our normal Apfelwein ratio)
  • Yeast!

The yeasts are:

  • White Labs Berliner Weisse, WLP630
  • White Labs Saison II, WLP566
  • White Labs Belgian Wit, WLP400
  • White Labs English Cider Yeast, WLP775
  • White Labs Belgian Style Yeast Blend, WLP575

I also had a White Labs English Cider Yeast that had been sitting in my refrigerator for even longer but was still well within date.

As for the making itself: I boil the corn sugar with a enough water for 5 minutes, stirring until its dissolved, then chuck it into the cider. Sanitation, sanitation, sanitation.

I took industrial bleach and soaked all of the buckets, which had been sitting our for quite some time, and then soaked an additional bucket, which had somehow had its insides covered in algae  Industrial bleach kills all. We washed them out a bunch of times, put iodophor water in and off to the races we went. First, though, we had to drill holes for bucket lids and sanitize them, as well as sanitize the lids.

So, I picked up 20 gallons and cider with the intention of using the gallons for the soon-not-so-great yeasts. Fortunately, we still had four 4-gallon buckets laying around as well as a 5-gallon. We hatched the plan, for five 4-gallon batches of cider, thus consuming the 20 gallons purchased and consuming the five vials of yeast hanging out in the refrigerator. Our calculations were a bit off: We forgot that, in addition to the sugar’s boiled water, a 4-gallon bucket can’t really take four gallons without spilling out the top. Nevertheless, we soldiered one, made our cider sheets, labeled the tops of the buckets (important, because we hadn’t been doing that as often, leading to a case of unknown-yeast cider in the keg, also remedied by the cider sheets) and put them in the spare room.

Our theory is: if they taste great, we keg them. If one doesn’t taste great, this is a super opportunity to try to start mixing ciders and seeing if we can create something tastier, especially because five different ones have all been started at the same time.

I can happily report they’re all fermenting and pressurized.

We’re calling them

“AW #?”
At this point, we really don’t know what batch we’re on and they’re their own, seperate thing, although they are using the Apfelwein (AW) sugar ratio.

Check back in a month!

20 gallons of cider in four 4-gallon buckets and one 5-gallon bucket.

All of the empty juice bottles.

This article was originally posted on Oct. 18, 2011 on my homebrew website, Fat Grey Tom’s Cider. It has been re-posted here with the same time stamp.

We had blackberries, frozen, on hand. Apparently, much like the Python’s elderberries, they do not go well.

Unlike our raspberry concoctions, the blackberry cider didn’t taste very good. It was always good enough to be drunk, but no more. We argued over who had to drink it.

The label’s nice though.

Just, we don’t make it again, unless we’re proven otherwise.

Maybe ageing will make it better. A bottle or two is sitting in our ageing cabinet.


Tags:
Apfelwein (AW) Batch #1

The frozen blackberries were boiled for 15 minutes with a tablespoon of brown sugar.


The cider label